A. How to Make Flashy Text
Example: 
1. First, go to the color toolbar on the right, and select a color that you want your text to be (the forground color will be the color of your text)
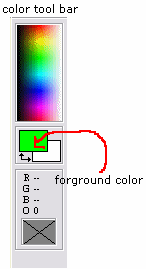
2. Ok, with yout icon now in the paint program, go to the tool bar and find the 'Text Icon' (it is the icon with the black 'A'). Click it, and then click inside the frame of the icon.

3. Next, the text window will pop up with tons of options. Make the font size be no bigger than 8. You can chose any font you want, as long as it comes out clear and precise. Then hit OK.
4. You will notice that the text you just made is dragable. Drag it in the spot you want it, and click the mouse once.
5. Now here's where the animation part comes in. Go to the tool bar again and click the 'Arrow" icon. Then select the frame that your icon is in.
6. Next go up to the main tool bar on the top and select "Edit>>Duplicate Selected".
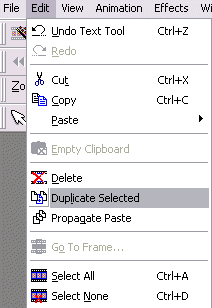
7. Now you will see that there are 2 frames now instead of one. Look at the regular toolbar now and select the "magnifyling glass" icon. Click the new 2nd frame with the magnifying glass a bunch of times until it is zoomed in very close.
8. Select a new color on the color tool bar, one that you think will go nicely with the first text color.
9. Now select the paint brush icon in the tool bar. Make sure that above the icon after you click it, it says the width is 1.
10. Now you have a choice of things to do to animate. You can either draw an outline border around the text, or color over the text with the new color. It's your choice.
11. When you are done, you can select the magnifying glass again and right click the frame to zoom back out to normal. Then go up to "View>>Animation" to preview your work!
12. If you think the animation is going too fast, simply select each frame one by one, and duplicate it. It will slow down the animation greatly.
13. When you are satisfied with your animation, go to "File>>Save".
14. A window will pop up with a little scroll bar on the left side. Make sure the box on the scrollbar is all the way at the top (it will make the animation the bext quality it can be). Then just keep clicking next until you are finished!

B. Make A New Frame With Text
Example: 
1. Go up to the top menu, and click "Animation>>Insert Frames>>Empty". Make sure it is set on 1 frame, set before frame 2, with delay time of 30. Also, leave it at blank to canvas color.
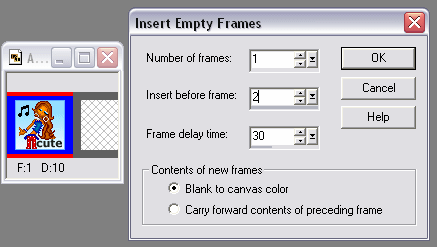
2. Now, select a foreground color in the color tool bar on the right hand side, which you will use for the background of the new frame.
3. Then click the paint can icon in the tool bar, and click inside the blank frame so that the space is now filled with the color you selected.
4. Now click the Text icon (the black A) and click inside the frame to add some text. Make sure it is a small, and clear font.
5. Once you have the text in there, you can go to "View>>Animation" to preview your work. (follow steps 12-14 of "How to make flashy text" to finish up the icon)
C. How to Make A Doll Blink
Example: 
1. This one is really easy. Select the frame with the arrow button, and go to "Edit>>Duplicate Selected".
2. Click the magnifying glass icon and zoom in on the second frame.
3. Ok, now if your icon has it's eyes open already, select the dropper icon (looks like an eye dropper) and then click on the darkest skin shade color on the doll. Then click the paint brush icon, make sure the width is on 1, and draw eyelids over the eyes. Next, select a black color to draw in eye lashes.
If your icon is a silent with the eyes closed already, it's a little tougher. Select white as your color, and using the paintbrush draw in the whites of your doll's eyes. Then on the line right above the eyes, use black to draw in the eyelashes and the pupils. If there is enough room on the eye, you can also draw in a color like blue, green or brown.
4. Once you've either drawn in the closed or open eyes, you can go to "View>>Animation" to preview your work. (follow steps 12-14 of "How to make flashy text" to finish up the icon).
D. How to Make A Frame Transition.
Example: 
1. Ok, this one is a little tricky. First, follow the "Make a New Frame With Text" Steps. Once you created one of those animated icons, save it and keep it open.
2. Next, use the arrow icon to select the first frame of the animation. The go to the top toolbar and select "Effects>>Insert Image Transition".
3. Now there are a lot of options that come up. There is a whole list of effects, but the one that I think works best for Icons is the "star wipe". You can select any one you want, but they might be too big for an icon. you can still try it though. For the transition length, make sure its on a low number, like 1.3 seconds or no greater than 2.0 seconds. Keep the frames per second around 17 fps. Then hit OK.
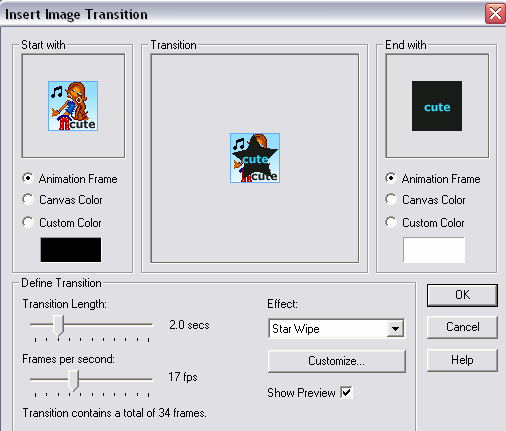
4. After you added the transition, you can go to "View>>Animation" to preview your work. (follow steps 12-14 of "How to make flashy text" to finish up the icon)
B. Why is my animation going so fast? How can I slow it down?
1. You need to increase the display time of each of your frames in your animation to slow it down. Longer display time in frames = a slower animation.
2. To increase the display time of your frames, first use the "arrow tool" to select which frame you want to increase the display time of.
3. After you have your frame selected, right click it and select the "frame properties" option. Then click the "display time" tab.
4. You can enter any number in the box to change the display time. For a really short display time (leading towards a faster animation) you would enter a number like "10" or "20". For a really long display time (leading towards a slower animation, so people could read any writing that might be on your frames) you would enter a number between 50 and 100.
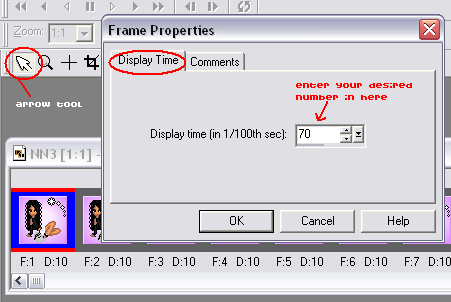
5. When you get it to your desired display time for all your frames, save it and you are all set.
C. What do I do if it says my animated icon is too big to use as an AIM icon?
1. If it says your animated icon is too large to be an AIM icon, then you need to either delete of some of your frames or make the *display time (*see the question above) of your frames a lesser number.
2. To get rid of some frames, simply use the arrow tool to select the icon you wish to delete, and then hit the "delete" key on your keyboard.
3. To make the display time of your frames a lesser number.. select a frame, right click it, select "frame properties", click the "display time" tab, and make the number smaller.
4. You are probably thinking, well, how do I know how many frames I have to get rid of or change to make the icon fit? Well, the maximum size for AIM icons I believe is no larger than 6.9 kilobytes.
5. To find out how many kilobytes your icon is, try saving your icon by selecting "file">>"save". A window will come up. Keep hitting "next" in the windows until you get to this window....
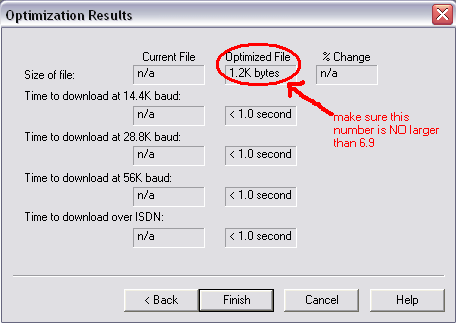
5. See how that number is circled? That is the number that tells you how many kilobytes your icon is. If it is under 6.9 kb, then you are all set! If it is over 6.9, then you need to get rid of more frames.